By: Team W10-4 Since: Sep 2018 Licence: MIT
1. Setting up
1.1. Prerequisites
-
JDK
9or laterJDK 10on Windows will fail to run tests in headless mode due to a JavaFX bug. Windows developers are highly recommended to use JDK9. -
IntelliJ IDE
IntelliJ by default has Gradle and JavaFx plugins installed.
Do not disable them. If you have disabled them, go toFile>Settings>Pluginsto re-enable them.
1.2. Setting up the project in your computer
-
Fork this repo, and then clone the fork to your computer
-
Open IntelliJ (if you are not in the welcome screen, click
File>Close Projectto close the existing project dialog first) -
Set up the correct JDK version for Gradle
-
Click
Configure>Project Defaults>Project Structure -
Click
New…and find the directory of the JDK
-
-
Click
Import Project -
Locate the
build.gradlefile and select it. ClickOK -
Click
Open as Project -
Click
OKto accept the default settings -
Open a console and run the command
gradlew processResources(Mac/Linux:./gradlew processResources). It should finish with theBUILD SUCCESSFULmessage.
This will generate all resources required by the application and tests. -
Open
XmlAdaptedPerson.javaandMainWindow.javaand check for any code errors-
Due to an ongoing issue with some of the newer versions of IntelliJ, code errors may be detected even if the project can be built and run successfully
-
To resolve this, place your cursor over any of the code section highlighted in red. Press ALT+ENTER, and select
Add '--add-modules=…' to module compiler optionsfor each error
-
-
Repeat this for the test folder as well (e.g. check link:https://github.com/CS2103-AY1819S1-W10-4/main/tree/master/src/test/java/seedu/souschef/commons/util/XmlUtilTest .java[
XmlUtilTest.java] andHelpWindowTest.javafor code errors, and if so, resolve it the same way)
1.3. Verifying the setup
-
Run the
seedu.souschef.MainAppand try a few commands -
Run the tests to ensure they all pass.
1.4. Configurations to do before writing code
1.4.1. Configuring the coding style
This project follows oss-generic coding standards. IntelliJ’s default style is mostly compliant with ours but it uses a different import order from ours. To rectify,
-
Go to
File>Settings…(Windows/Linux), orIntelliJ IDEA>Preferences…(macOS) -
Select
Editor>Code Style>Java -
Click on the
Importstab to set the order-
For
Class count to use import with '*'andNames count to use static import with '*': Set to999to prevent IntelliJ from contracting the import statements -
For
Import Layout: The order isimport static all other imports,import java.*,import javax.*,import org.*,import com.*,import all other imports. Add a<blank line>between eachimport
-
Optionally, you can follow the UsingCheckstyle.adoc document to configure Intellij to check style-compliance as you write code.
1.4.2. Setting up CI
Set up Travis to perform Continuous Integration (CI) for your fork. See UsingTravis.adoc to learn how to set it up.
After setting up Travis, you can optionally set up coverage reporting for your team fork (see UsingCoveralls.adoc).
| Coverage reporting could be useful for a team repository that hosts the final version but it is not that useful for your personal fork. |
Optionally, you can set up AppVeyor as a second CI (see UsingAppVeyor.adoc).
| Having both Travis and AppVeyor ensures your App works on both Unix-based platforms and Windows-based platforms (Travis is Unix-based and AppVeyor is Windows-based) |
1.4.3. Getting started with coding
When you are ready to start coding,
-
Get some sense of the overall design by reading Section 2.1, “Architecture”.
-
Take a look at [GetStartedProgramming].
2. Design
2.1. Architecture
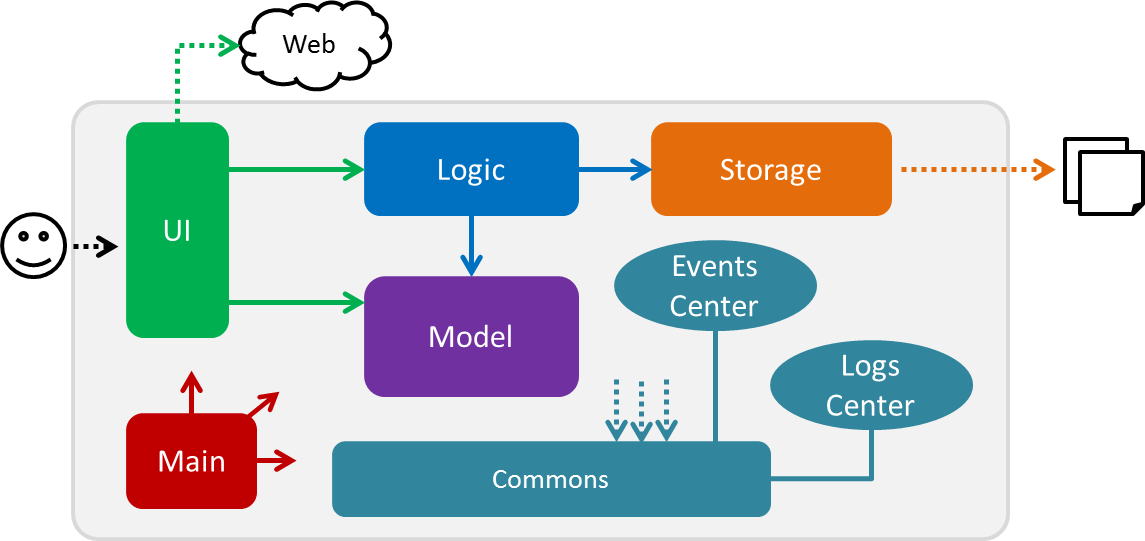
The Architecture Diagram given above explains the high-level design of the App. Given below is a quick overview of each component.
The .pptx files used to create diagrams in this document can be found in the diagrams folder. To update a diagram, modify the diagram in the pptx file, select the objects of the diagram, and choose Save as picture.
|
Main has only one class called MainApp. It is responsible
for,
-
At app launch: Initializes the components in the correct sequence, and connects them up with each other.
-
At shut down: Shuts down the components and invokes cleanup method where necessary.
Commons represents a collection of classes used by multiple other components. Two of those classes play important roles at the architecture level.
-
EventsCenter: This class (written using Google’s Event Bus library) is used by components to communicate with other components using events (i.e. a form of Event Driven design) -
LogsCenter: Used by many classes to write log messages to the App’s log file.
The rest of the App consists of four components.
Each of the four components
-
Defines its API in an
interfacewith the same name as the Component. -
Exposes its functionality using a
{Component Name}Managerclass.
For example, the Logic component (see the class diagram given below) defines it’s API in the Logic.java interface and exposes its functionality using the LogicManager.java class.
Events-Driven nature of the design
The Sequence Diagram below shows how the components interact for the scenario where the user issues the command delete 1.
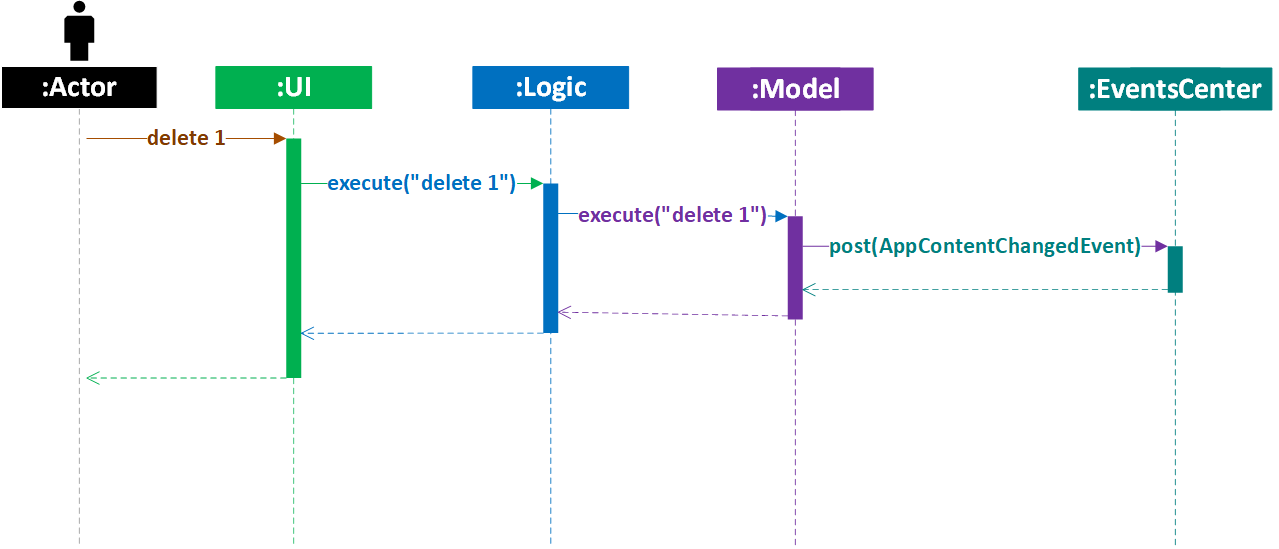
delete 1 command (part 1)
Note how the Model simply raises a AppContentChangedEvent when the Sous Chef data are changed, instead of asking
the Storage to save the updates to the hard disk.
|
The diagram below shows how the EventsCenter reacts to that event, which eventually results in the updates being saved to the hard disk and the status bar of the UI being updated to reflect the 'Last Updated' time.
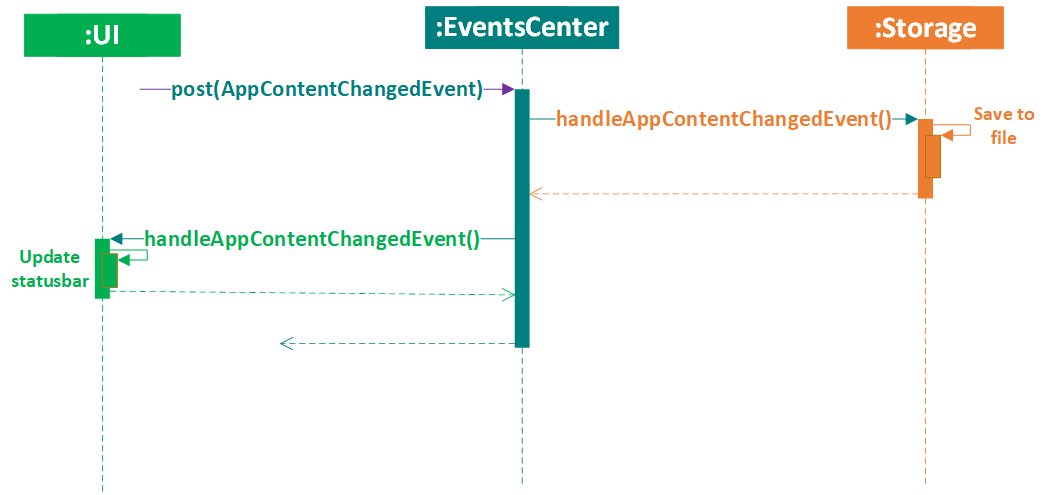
delete 1 command (part 2)
Note how the event is propagated through the EventsCenter to the Storage and UI without Model having to be coupled to either of them. This is an example of how this Event Driven approach helps us reduce direct coupling between components.
|
The sections below give more details of each component.
2.2. UI component
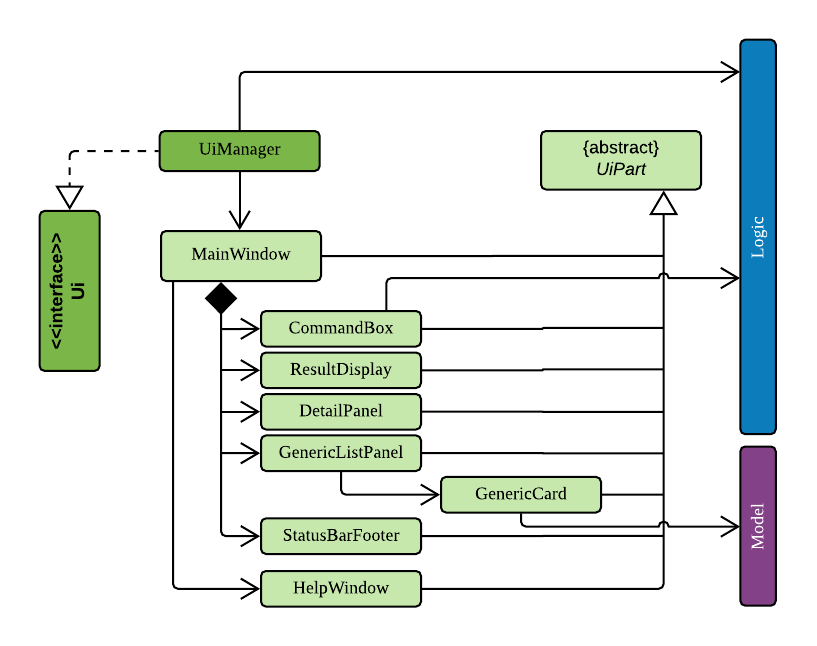
API : Ui.java
The UI consists of a MainWindow that is made up of parts e.g.CommandBox, ResultDisplay, GenericListPanel, StatusBarFooter, DetailPanel etc. All these, including the MainWindow, inherit from the abstract UiPart class.
The UI component uses JavaFx UI framework. The layout of these UI parts are defined in matching .fxml files that
are in the src/main/resources/view folder. For example, the layout of the
MainWindow is specified in
MainWindow.fxml
The UI component,
-
Executes user commands using the
Logiccomponent. -
Binds itself to some data in the
Modelso that the UI can auto-update when data in theModelchange. -
Responds to events raised from various parts of the App and updates the UI accordingly.
2.2.1. Modularisation
List Panel
Brief overview: Many of the features (such as MealPlanner, HealPlan, IngredientManager, Recipes, Favourites) need to use the list panel section to display their own UniqueType classes. Therefore, this has been abstracted and modularised for easier implementation of usage and for any future implementation of new components which may need to use the list panel. This is done by inserting generic classes into the hierarchy.
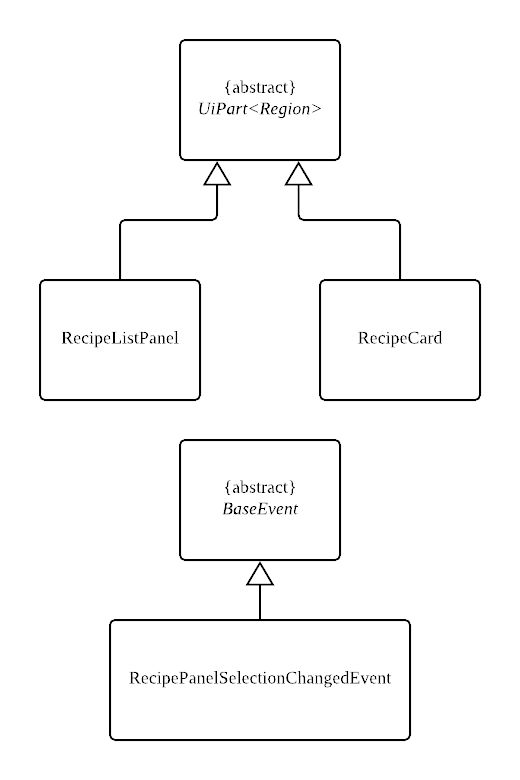
Old Hierarchy:
New Hierachy:
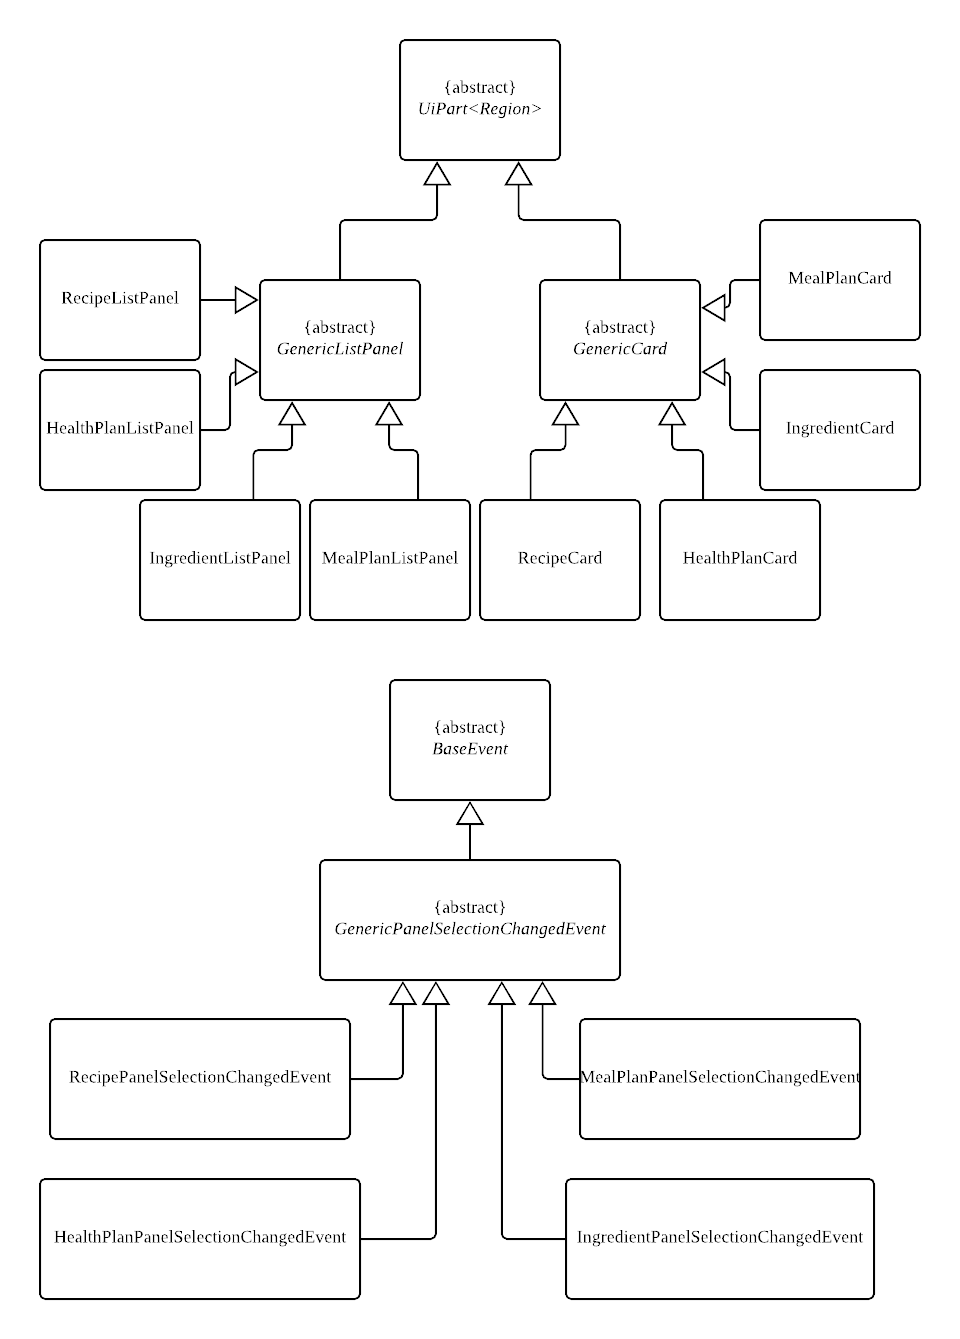
| Not all the components are shown, only MealPlanner and Recipe components are shown in the diagram as an example. Notice how the new generic abstract classes are simply inserted between the superclass and subclass of the old hierarchy to give the new hierarchy. |
Explanation:
With the GenericListPanel, GenericCard and GenericPanelSelectionChangedEvent classes, new features which wish to use the UI list panel simply have to have their respective classes extend these three abstract classes and implement their methods accordingly. Then the respective fxml files for [feature]ListPanel and [feature]Card have to be created.
MainWindow.java and ListPanelSwitchEvent.java:
ListPanelSwitchEvent encapsulates an event where the list panel needs to change context.
It extends BaseEvent and contains a Context attribute to store information on which context
the list panel needs to switch to.
To switch between different list panels for different features, switchTo[feature]ListPanel()
methods have to be implemented in MainWindow. This method gets the respective filteredList
from the model within modelSet within logic and uses it to change the generalListPanel.
The handleListPanelSwitchEvent() method is invoked when a ListPanelSwitchEvent is posted
to the EventsCenter, and the method then checks the context attribute of the ListPanelSwitchEvent
object to determine which context the list panel needs to switch to, and then calls the correct method.
Usage:
Now in order to switch between the different feature list panels, the developer just has to create their handler method, instantiating a ListPanelSwitchEvent with their desired context and then raising the event by posting it to the EventsCenter.
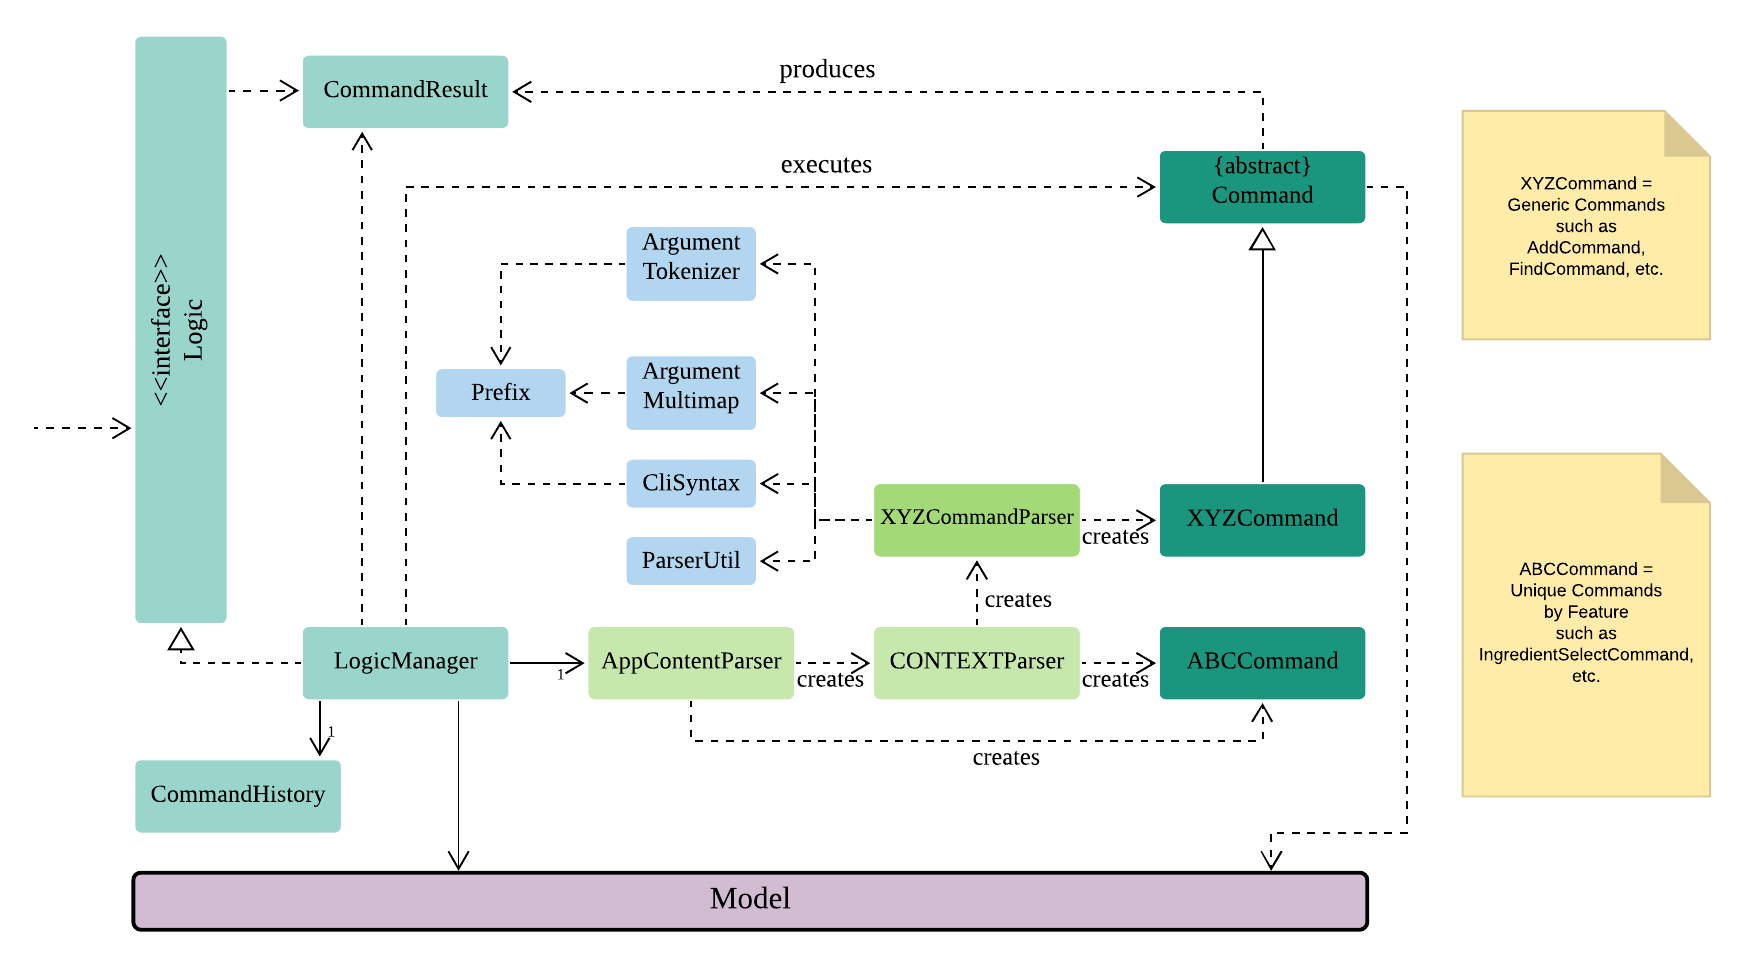
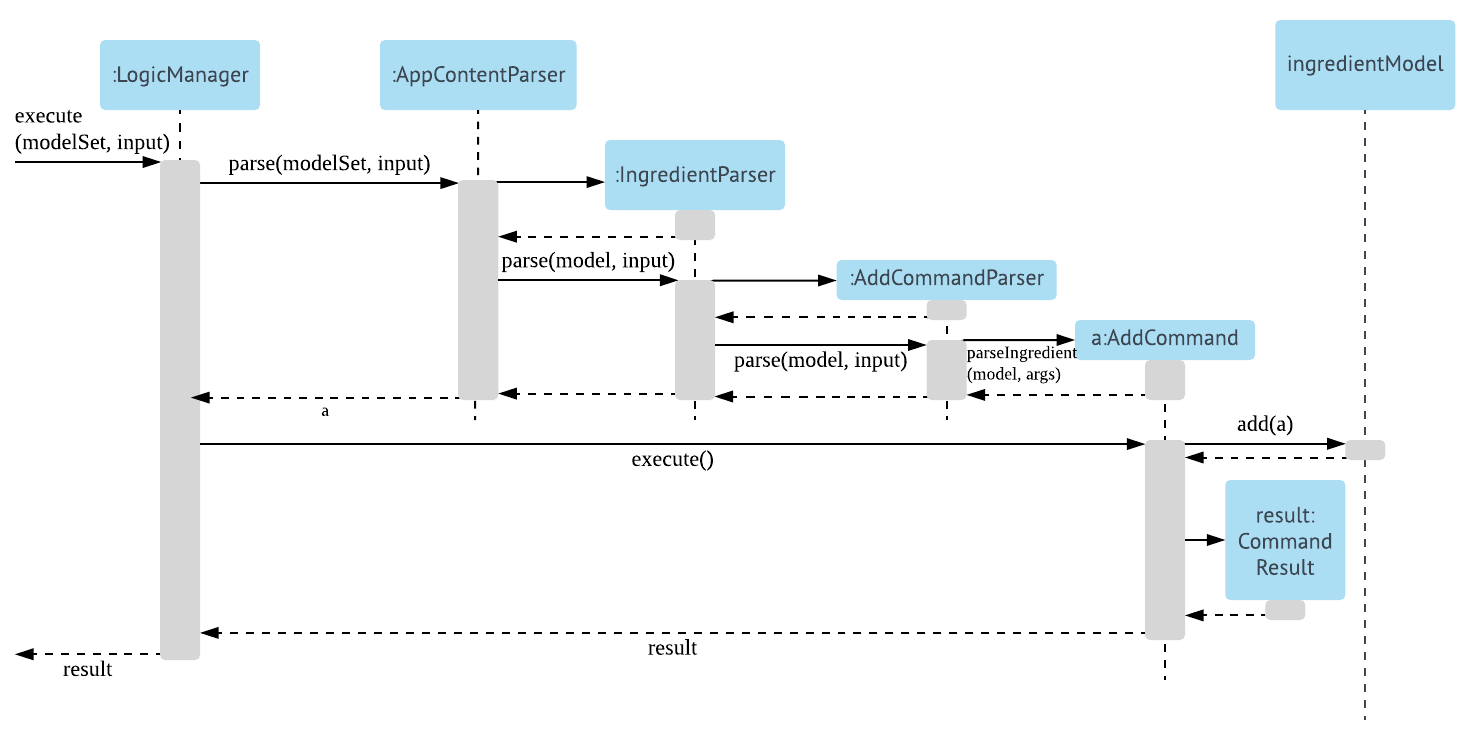
2.3. Logic component
API :
Logic.java
-
Logicuses theAppContentParserclass to parse the user command. -
AppContentParserpasses necessary model to each feature parser such asIngredientParseraccording to the context. -
This results in a
Commandobject which is executed by theLogicManager. -
The command execution can affect the
Model(e.g. adding an ingredient) and/or raise events. -
The result of the command execution is encapsulated as a
CommandResultobject which is passed back to theUi.
Given below is the Sequence Diagram for interactions within the Logic component for the execute("add onion 100
gram 10-23-2018") API call.
2.4. Model component
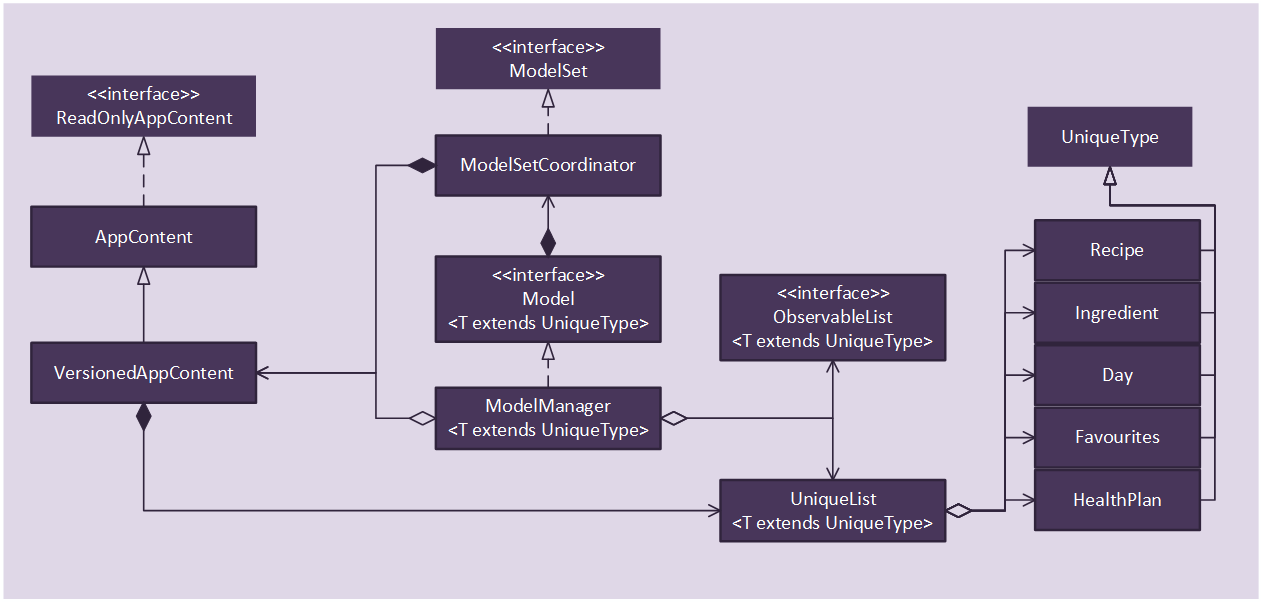
API : ModelSet.java,
Model.java
The ModelSet,
-
stores a
UserPrefobject that represents the user’s preferences. -
stores the Sous Chef application data.
-
Contains multiple
Modeleach in-charge of a feature’s data.
-
-
shares a single instance of VersionedAppContent to ensure single version of truth.
-
does not depend on any of the other three components.
The Model,
-
each represents a feature-unique data.
-
ensures data abstraction for each feature.
-
-
is reusable as model is now generic.
-
exposes an unmodifiable
ObservableList<T extends UniqueType>that can be 'observed' e.g. the UI can be bound to this list so that the UI automatically updates when the data in the list change.
2.5. Storage component

API : Storage.java
The Storage component,
-
can save
UserPrefobjects in json format and read it back. -
can save the various xml files from each of the different functions. Namely recipe.xml, ingredients.xml and healthplan.xml
-
can do a context switch for storing information into the correct xml file for the function.
-
generalized in its implementation for easy extension
-
controls information by passing a single appContent unit around the system.
-
With the new implementation of the storage component, calls at the upper layers are generalized and all components shares common calls for load and saving.
-
The new storage component introduces a new abstract parent (XmlFeatureStorage) and also a new interface (XmlSerializableGeneric) to make all the calls of load and save to be generic to allow easy functional implementation without much creation of new methods at the storage level. Just by calling the context switch and also the save and load calls the intended result will be achieved.
2.6. Common classes
Classes used by multiple components are in the seedu.souschef.commons package.
3. Implementation
This section describes some noteworthy details on how certain features are implemented.
3.1. Ingredient Manager
3.1.1. Total management of ingredients that user currently have
Ingredient Manager is an address book of ingredients, with some basic functions similar to that of a normal address
book such as
add, edit, delete and list. Additionally, Ingredient Manager has some useful functions specific for management of
ingredients.
Firstly, serving units can be converted to a common serving unit with reference to the serving unit dictionary.
Conversion to a common serving unit is necessary to enable arithmetic calculation between amounts. Also, it is easier to
compare
between ingredients when the amounts are shown in common serving units. Secondly, when you apply the list command,
ingredients are sorted by date. Since ingredients have to be consumed in a limited period, it keeps user be reminded of
old ingredients.
Current implementation of serving units dictionary
Ingredient Manager uses gram for the common serving unit. Serving unit dictionary is implemented with static
HashMap in
IngredientServingUnit class, which
contains
names of a serving unit as a key and a IngredientServingUnitDefinition object as a value.
IngredientServingUnitDefinition has three fields, which are a serving unit to be converted, a common serving unit,
and
a constant to be multiplied for conversion. When conversion is to be done, you find the value in the HashMap with an
input serving unit as a key. Then, you multiply the amount of ingredient with the constant and replace the current
unit with a
common unit. This process is wrapped in a method called convertToCommonUnit() in ingredient models which contains
amount field.
Alternative Implementation of serving units dictionary
In the current implementation, a serving unit to be converted exists both as a key and in a value of the HashMap. This duplication can be removed by transforming the form of the value in the HashMap from a definition object to an array containing the other two fields of the object. However, creating a separate class to wrap three fields is more desired for abstraction. In the current version of the application, definition object is only used for conversion to a common serving unit. But in later version, conversion can be done the other way around for the purpose of display. Also, in a more complete version of the dictionary, definition should be expanded to cover information related to validity of combination between specific serving unit and ingredient, and its conversion value. Also, using HashMap brings huge convenience in further implementation of functions which include searching of value in the dictionary, cancelling out the cost of duplication.
3.1.2. View recipes according to ingredients, and check shop amount
This command works on separate context called cross, because the result of command manipulates list of recipes, not ingredients. The command filters(include) and sorts(prioritize) recipes based on ingredients given in the command, and makes use of information stored in Ingredient Manager in two ways. Firstly, you can provide all ingredients in Ingredient Manager as parameter for filtering or sorting. This might be useful when a user wants to find recipe that maximizes the use of existing ingredients. Secondly, for the recipes that are on the list as a result of filtering and sorting, additional amount of ingredients that need to be prepared for a recipe is calculated. Because ingredients in Ingredient Manager are considered as stock that the user currently have, their amounts are subtracted from the desired amount, calculated considering the number of servings. After cooking, she can go back to Ingredient Manager and edit amount of ingredients or delete ingredients used for cooking.
Current implementation of cross recipe model
Although it looks similar, models used for recipe context and cross context are different. crossRecipe class extends
Recipe class with one more additional field, a Map named neededIngredients. This has IngredientDefinition object as a
key,
and IngredientPortion object as a value. It is to store information of needed amount of an ingredient to amount field of IngredientPortion object after calculation is done.
Current implementation of ingredient models
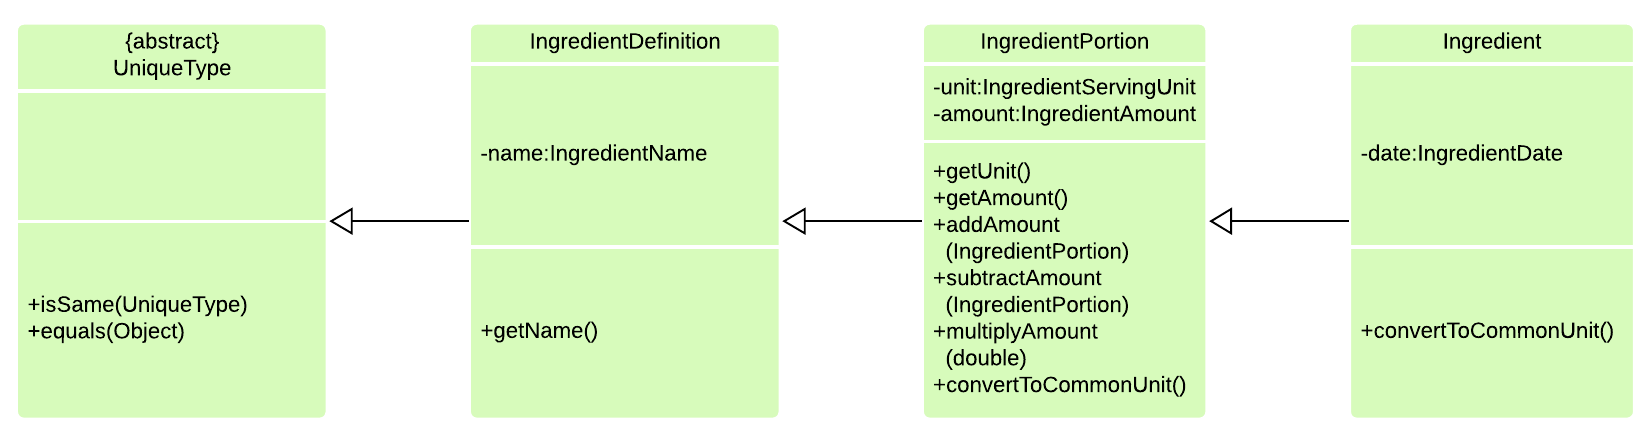
There are three ingredient related models, namely IngredientDefinition, IngredientPortion, and
Ingredient.
IngredientDefinition is a wrapper class for ingredient name. IngredientPortion inherits IngredientDefinition and
additionally includes amount
field. Ingredient again inherits IngredientPortion, and it is the most complete version of ingredient with date
information, used by Ingredient Manager.
Reason for hierarchical implementation is that there exists different needs for ingredient related fields
across features or functions. For example, ingredient in recipe uses IngredientPortion, and ingredient in Ingredient
Manager uses Ingredient. IngredientDefinition is used as a key of a HashMap in implementing 'view recipes
according to ingredients' function. It can be used to construct ingredient dictionary or to expand unit dictionary in
the future version of the application.
3.2. Meal Planner feature
3.2.1. Current Implementation
Model
The Meal Planner feature is supported by the classes Meal and Day.
Class diagram:
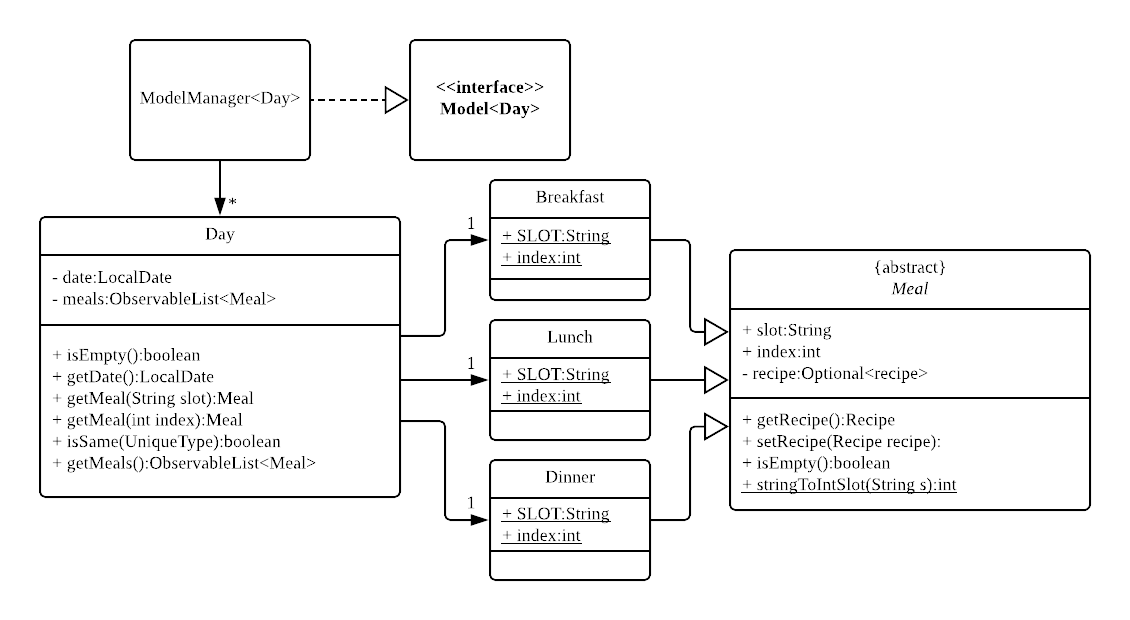
Brief explanation:
Meal Planner is currently implemented as a list of non-empty Day objects. This is ensured as Day objects are only instantiated when recipes are added to a certain date, with that date being assigned to its Day object. When all the recipes are deleted from a certain Day, the Day object is removed from the Meal Planner. Day objects in the Meal Planner list panel are sorted in chronological order according to their dates. This is done by sorting the list when instantiated and when Day objects are added or removed.
Logic
For Meal Planner commands to be accessible, context has to be switched to "Meal Planner
via the command -mealplanner (except for the case of the plan command for adding recipes
to the Meal Planner, which has to be done in the recipe context since the user needs to be able
to see the recipes). From there, the Meal Planner commands can be used and
AppContentParser will redirect the different commands to their respective CommandParser.
Plan Command: plan
The plan command adds a recipe from the recipeModel to the mealPlannerModel. Therefore both models have to be passed to PlanMealCommandParser.
Within PlanMealCommandParser, it parses the target date from a String into a LocalDate. Only dates from the present or future are allowed to be entered. This LocalDate object is then used to find out whether mealPlannerModel currently contains a Day with the target date. If such a Day object already exists, it is taken from mealPlannerModel to be used in PlanMealCommand. Else, a new Day object is instantiated with the target LocalDate date. The target meal is then taken from the Day object. mealPlannerModel, target day target recipe and target meal are then passed to PlanMealCommand.
Within the execute method of PlanMealCommand, target recipe is then added the target meal and target day is then added to mealPlannerModel.
Finally, the new content is committed via mealPlannerModel.commitAppContent().
Select Command: select
The select command selects a recipe of a specified meal of a specified day and displays the details
of the recipe (ingredients, instructions, etc) in the DetailPanel.
MealPlannerParser invokes the parseMealRecipe() command of SelectCommandParser. The desired
index and meal index are parsed from the user input and used to extract the recipe from the
specified day’s desired meal index. Using this recipe, the recipeModel is searched and the
index of the matching recipe is returned.
The index and the recipeModel are then passed to
a SelectCommand which executes the displaying of the recipe details in the same manner as
in the recipe context.
Clear Command: clear
The clear command simply clears the Meal Planner of all days.
This is done by setting (i.e. replacing) the existing UniqueList of mealPlannerModel
with a new empty UniqueList.
Delete Command: delete
The delete command deletes a specified Day from the mealPlannerModel along with all its meals.
The Day is specified by its index as seen on the list panel.
MealPlannerParser invokes the parseMealPlan() method of DeleteCommandParser. The user input
is then parsed to get the index of the Day to be deleted. The Day object at the given index
of the mealPlannerModel list is then deleted.
Alternative implementation
Earlier MealPlanner implementation used a ObservableHashMap with LocalDate and Day as the key and value
pairs, each LocalDate being the key for the Day with the same LocalDate. Theoretically, this
would work as well. However, this was scrapped as a simple ObservableList of Days would work
equally well. In addition, since AB4 already has an implemented UniqueList, using a simple
List makes it easier to integrate the Meal Planner into the existing infrastructure.
HashMaps are mainly used as they give a time complexity advantage, having an O(1) time complexity.
However, that advantage is not present here since our Lists usually access elements by index,
and thus also have a time complexity of O(1).
3.3. Favourites list
This feature allows users to have a quick reference to all of their favourite recipes. Users are able to add recipes that they like a lot, or that they cook often to the favourites list. Users are also able to search, display details, and remove any entry within the favourites list.
Model
The model is simply a UniqueList of Recipes.
Logic
To access favourite context commands, context has to be switched to "Favourites" via the command -favourite. From
there, the Favourite commands can be used and AppContentParser will redirect the different commands to their
respective CommandParsers.favourite command for adding recipes to the Favourites list is done in recipe context.
3.3.3. Adding to Favourites
While browsing the recipes in the recipe context, and when a user likes a recipe at a particular INDEX, they can
execute the favourite INDEX command. The recipe selected would be copied from the recipe model, and added to an array
list in the favourites model.
3.3.4. Selecting a Favourite Recipe
While browsing the favourite recipes in the favourite context, if the user wishes to view the details of the recipe,
they can execute the select INDEX command. From the array list in the favourites model, the 1 based index will be
accessed, and its details will be displayed in the panel.
3.3.5. Finding a Favourite Recipe
The user can also browse and search favourite recipes by tag. Similar implementation as 'find' command in recipe context.
3.3.6. Deleting a Favourites Recipe
While browsing the recipes in the recipe context, and when a user wants to remove a recipe at a particular INDEX,
they can execute the delete INDEX command. From the array list in the favourites model, the index will be accessed,
and the recipe will be deleted form the favourites model.
3.3.7. Clearing Favourites
The clear command clears the Favourites List of all Recipes.
The command replaces the existing UniqueList of favouriteModel
with a new empty UniqueList.
3.4. Recipe Management
3.4.1. Multi-line Recipe Adding
Current Implementation
As the adding of recipes deal with lengthy input parameters from the basic details such as name to a list of instructions, single-line add command proves to be inefficient and often providing an inconvenient user experience. To allow flexibility, adding of recipes have been implemented as a multi-line command fitting into this CLI application.
Multi-line add function consists of 3 main commands: add cont end. The add command requires user input of the
recipe basic information such as Name, Difficulty, CookTime and the optional Tag. The cont command requires
user input of the recipe Instruction. Each cont command allows only 1 Instruction. Again this is to
break down the lengthy input parameter of Instruction. Lastly, with the end command the Recipe is being
recognised and is added to the Model.
The following is the sequence diagram of the add command:
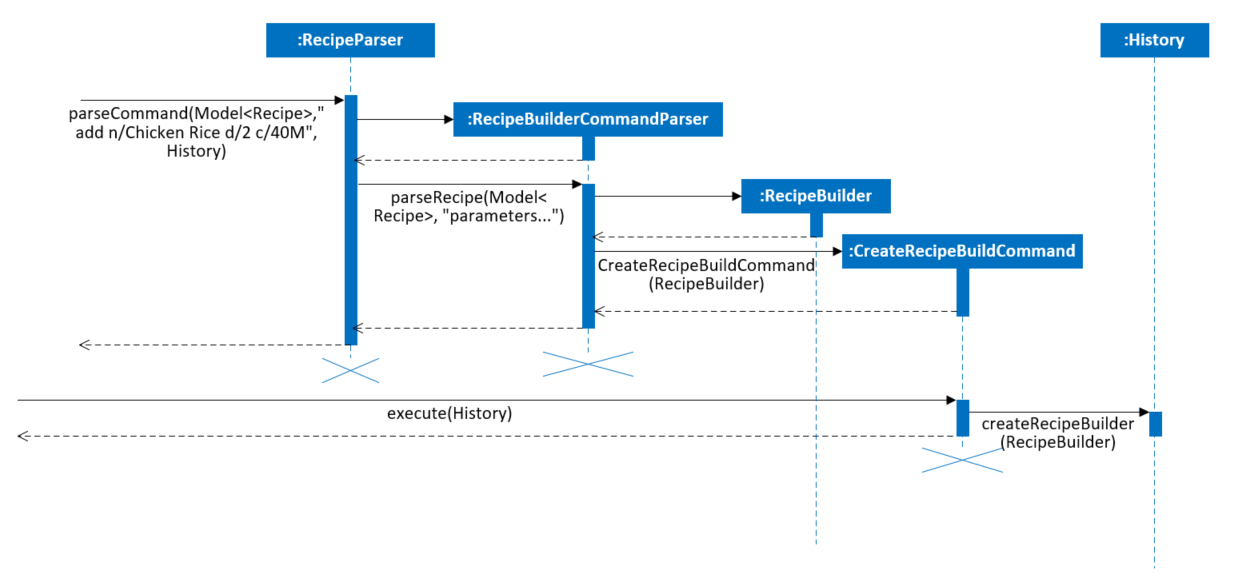
Once user’s input is being parsed, a RecipeBuilder is created instead of a Recipe instance. This RecipeBuilder
will be stored in History when the command is being executed.
|
Repeating use of |
The following is the sequence diagram of the cont command:
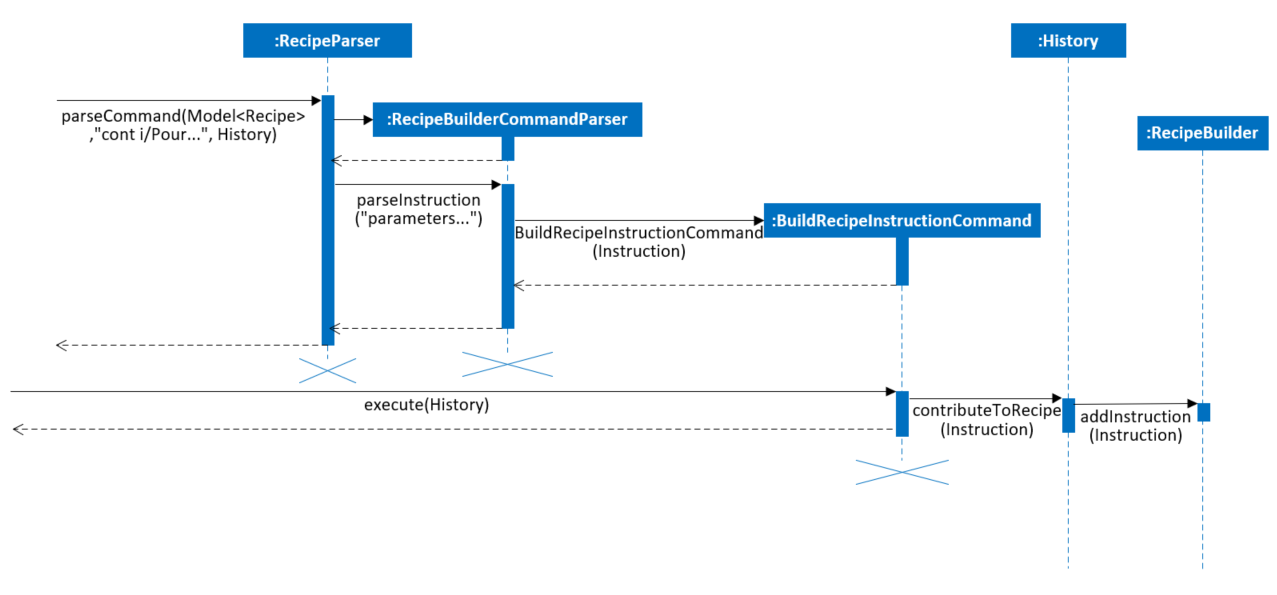
Upon parsing the user’s input that contains Instruction, a Instruction instance will be created. This
Instruction is to be passed to the command for execution. The execution process once again make use of the History
to append the Instruction into RecipeBuilder.
The following is the sequence diagram of the end command:
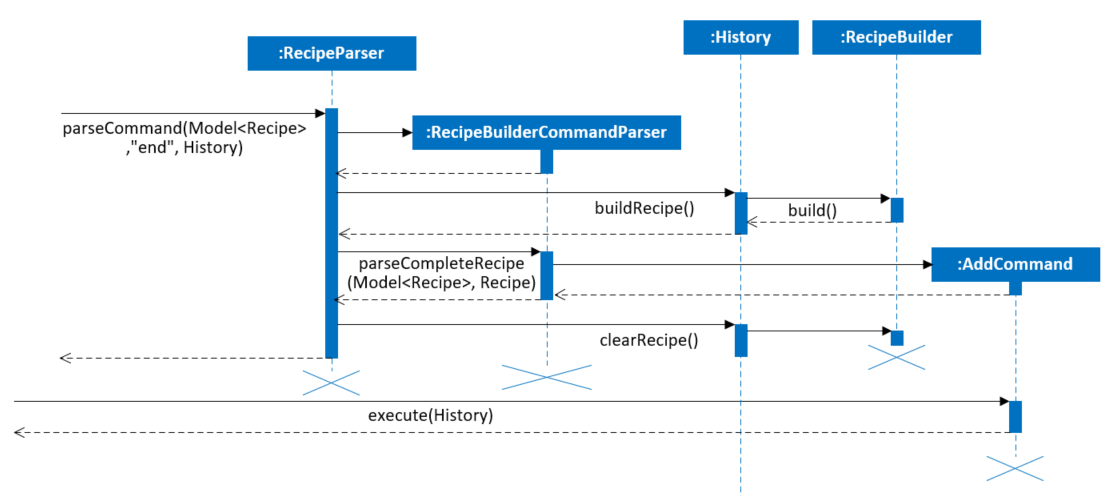
Upon receiving the end command, Recipe will be built from the RecipeBuilder. The parsing process checks to
ensure that the Recipe built contains at least a single Instruction to prevent adding of Recipe without
Instruction. With a valid Recipe, a AddCommand will be created and the RecipeBuilder in History will be
cleared (i.e. set to null). This AddCommand when executed will add the Recipe into Model.
Why it is implemented that way:
Due to the nature of a multi-line add command where the Recipe is incomplete together with the inability to execute
the add
function immediately, 2 mechanisms namely, a builder and a historical storage, have to be put
in place. The builder works effectively in managing the data of a partial Recipe while allowing continuous
modification. The historical storage, History in this context, ensures that lossless partial
Recipe data. Moreover, since History interaction with commands has already been well establish in Logic
component and a partial Recipe is indeed a representation the historical commands, storing in History
becomes a dominant choice.
Alternatives:
-
Adding of incomplete recipe to the model and edit that recipe with the subsequent commands.
-
Pros - Make use of existing add and edit command without the need of additional implementation.
-
Cons - Model contains incomplete recipe that violates the validity of recipe data. This might be exploited and in the process the application can be filled with incomplete recipes.
-
3.4.2. All-field Recipe Search
The all-field recipe search matches keywords with details of Recipe.
Each keyword goes through the matching process against the Name, Tag, Difficulty, CookTime and even
IngredientPortion from each Instruction of every recipe.
Such search feature provides a complex querying, rather than a superficial search on merely recipes' name.
Current Implementation
The following recipe class diagram shows the data structure of Recipe to support searching:
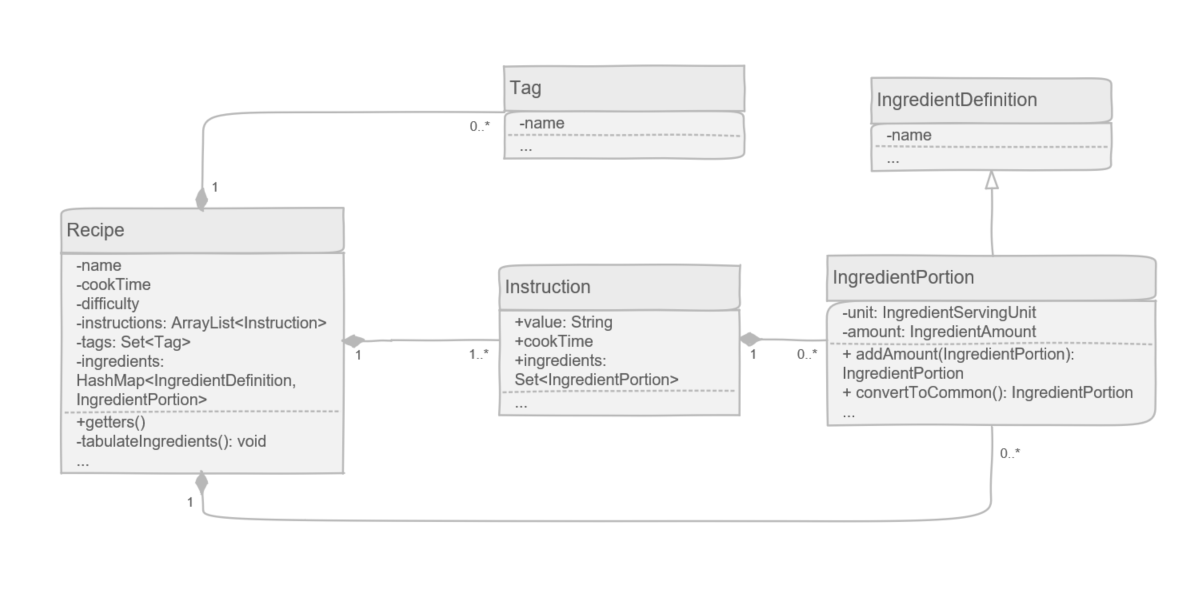
Other than the basic Recipe details accessible via the getters(), nested attribute such as IngredientPortion
can post difficulty for the search function since Recipe and IngredientPortion is not associated initially. To
allow direct access to all IngredientPortion of that recipe, a tabulateIngredients() method is added. This method
stores all
IngredientPortion in the HashMap of ingredients
attribute by searching through all Instruction. As Recipe is immutable, the generating of the ingredients is
done in the constructor of Recipe (i.e. tabulateIngredients() is called in the constructor). This allow the
direct accessing all attributes required for the search to completed.
To implement this feature, recipe Model is implemented with FilteredList. This list takes in a predicate to
filter away recipes that does not meet the requirement.
The desired search keywords, once parsed as List of String will be turned to Stream. Each keyword is checked
against a recipe Name for any matching word, Difficult for exact matching value, Tag for any matching
word, and Ingredient for any matching IngredientDefinition. All keywords must return true (i.e. matching at least
one attribute of the recipe) before the recipe is deemed fit to be kept in the FilteredList.
The following code snippet shows how the predict determines each recipe:
public boolean test(Recipe recipe) {
    if (keywords.size() == 0) {
        return false;
    }
    return (keywords.stream()
            .allMatch(keyword -> {
                return StringUtil.containsWordIgnoreCase(recipe.getName().fullName, keyword)
                        || recipe.getCookTime().toString().toLowerCase().equalsIgnoreCase(keyword.toLowerCase())
                        || recipe.getDifficulty().toString().equals(keyword)
                        || recipe.getTags().stream()
                        .anyMatch(tag -> StringUtil.containsWordIgnoreCase(tag.tagName, keyword))
                        || recipe.getIngredients().keySet().stream().anyMatch(ingredientDefinition -> StringUtil
                        .containsWordIgnoreCase(ingredientDefinition.toString(), keyword));
            }));
}
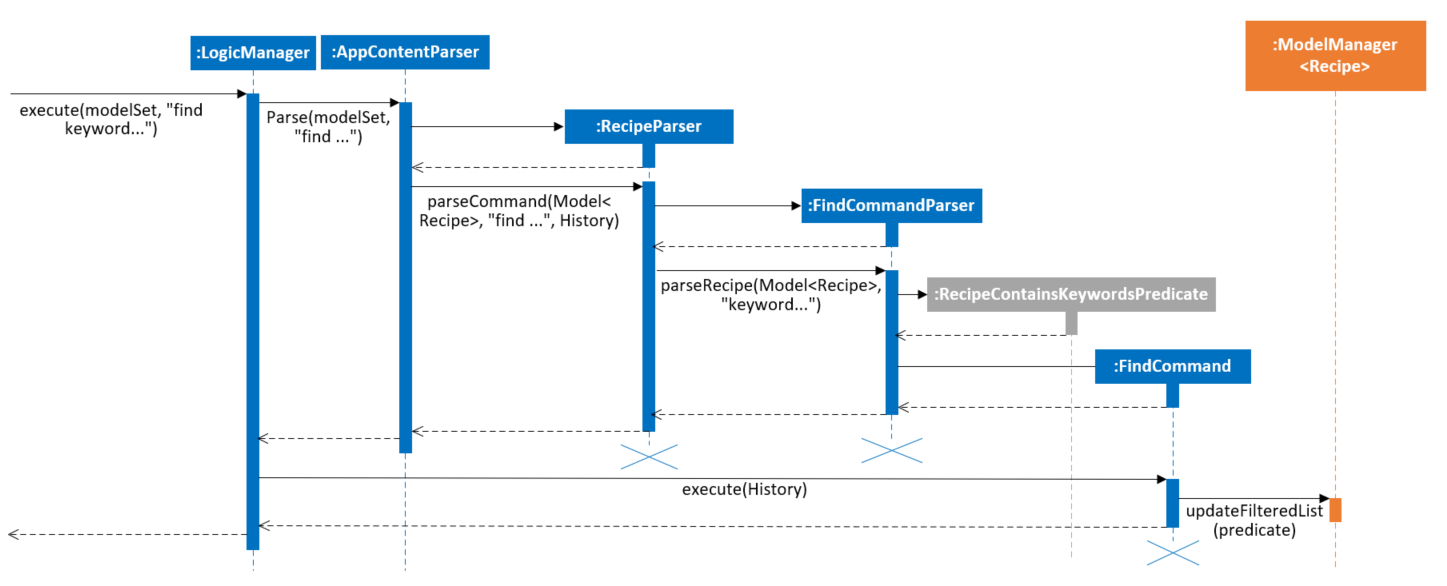
The following sequence diagram shows how the keywords are being parsed to feed into the predicate:
Why it is implemented that way:
Due to the existing data structure implemented by model, to access the attributes within a recipe, the system needs to use its getter and perform matching with its keywords. Hence, a filter via predicate testing is deemed fit.
Alternatives:
-
Tag saving recipes that uses it.
-
Pros - Search done more effectively as the system only need to display all recipes stored in a tag
-
Cons - Bi-directional association, increase difficulty in maintaining data integrity
-
-
Saving IngredientPortion directly in recipe instead of individual instruction.
-
Pros - Remove the need to search through the initial every instruction to gather the ingredients for every new instance of recipe. Speed up the recipe add and read process.
-
Cons - Since ingredients are aggregated from instruction, by allowing IngredientPortion to be a direct attribute of recipe imply a possibility of mismatch between the ingredients in the instruction and the ingredients in the recipe. (e.g. User entering ingredients that are not used by any instruction)
-
3.5. Health Plan
This is a feature that users can access to have health plans to manage their diet and health due to dietary needs of their choice. Users are able to add a health list to based on their specifications: whether they intend to gain/lose/maintain weight from their set age, current weight and also their current height. this will then tell them what is the required calories to eat per day to hit their target.
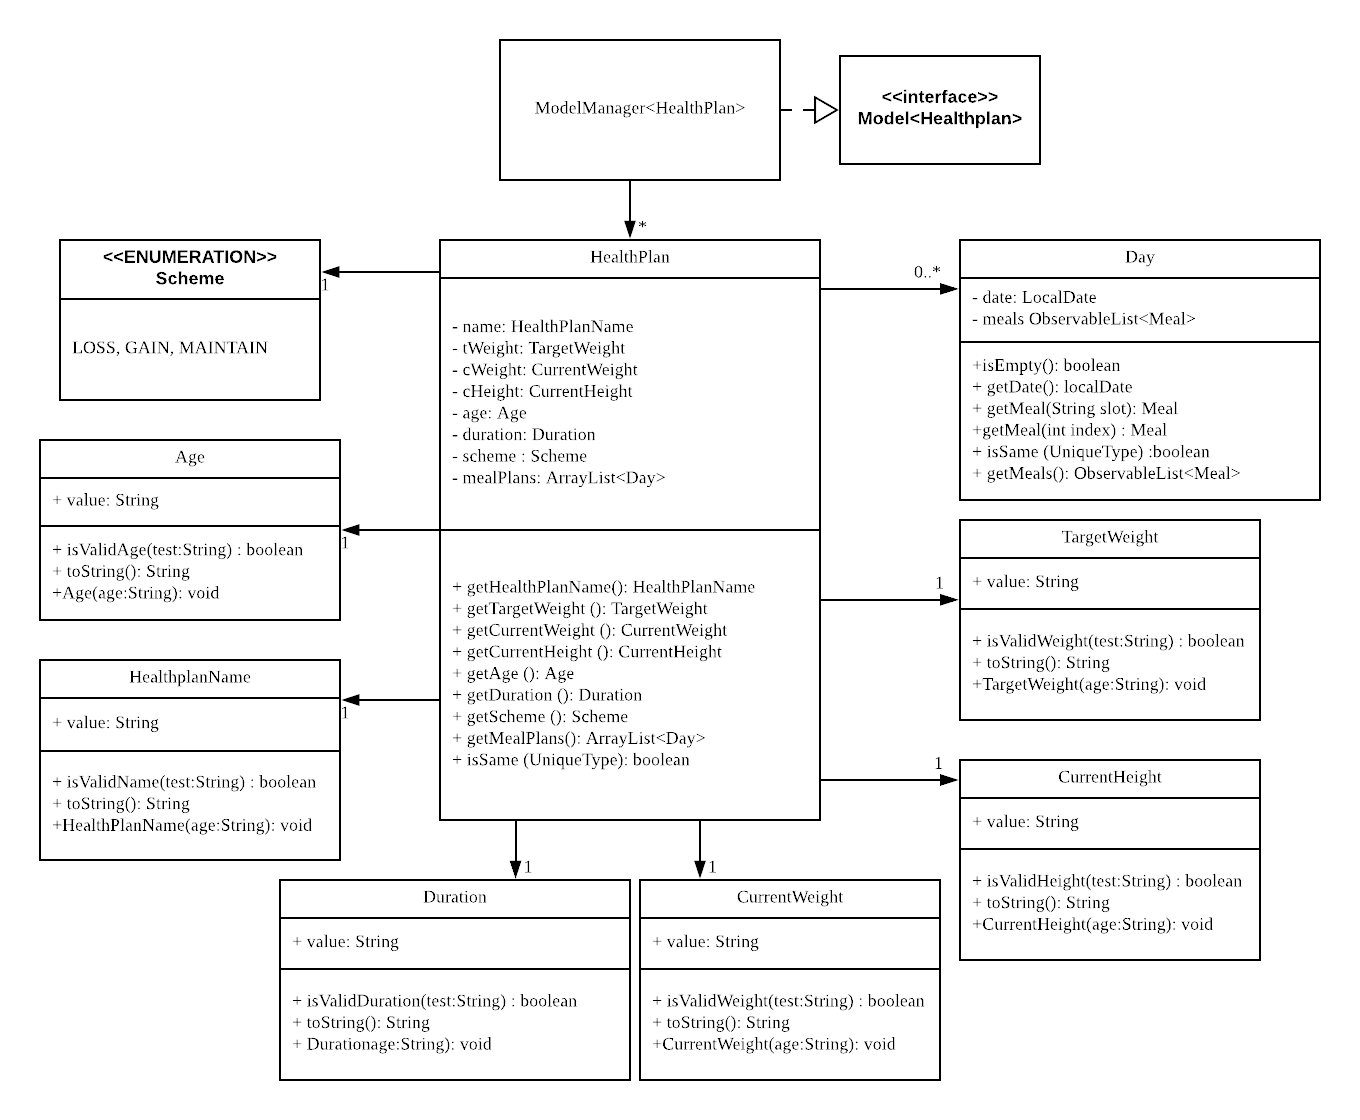
3.5.2. Current implementation
-
Users are able to add to the list based on their personal settings: name, age, height, weight, target weight, duration, scheme (gain/loss/maintain)
-
Users are able to delete entries that they do not want to keep anymore.
-
Users are aso able to edit entries which information is incorrect.
-
Users are able to add days of the meal planner segment into chosen health plan
-
Users are able to display all days of the meal planner segment concurrently with the health plan lists
-
Users are able to display the details of a health plan to see the days stored and also other information
-
Users are able to remove days of the health plan they added.
-
Users are now able to view the calories count from the meals they included into the healthplan and when the details of the health plan is shown the target to hit will be shown to the user, in value and also bar chart. Along with such info, there is also a percentage met to show how much of the target is already achieved.
3.5.3. Ongoing implementation (Implementing plan comparisons)
This new implementation of this feature will allow the users to select 2 plans of their choice and compare with a side by side comparison of the calories consumed. This information will be displayed to the user much like the show details command that is available with slight tweaks. There will not be a percentage met but instead the feature will try to cover breakdown of the calories intake by day using the set duration of the targetted plans. This will provided clarity of the day by day consumption of calories of the user across 2 plans. The information will be in calculated values and then displayed in a series of bar graphs for quick understanding of the information by just looking at the graphs.
3.5.4. Ongoing implementation (Expiry of health plans)
The new implementation of this feature should have an expiry feature that counts down the system base on the app’s date against the duration set by the user.
3.6. Logging
We are using java.util.logging package for logging. The LogsCenter class is used to manage the logging levels and logging destinations.
-
The logging level can be controlled using the
logLevelsetting in the configuration file (See Section 3.7, “Configuration”) -
The
Loggerfor a class can be obtained usingLogsCenter.getLogger(Class)which will log messages according to the specified logging level -
Currently log messages are output through:
Consoleand to a.logfile.
Logging Levels
-
SEVERE: Critical problem detected which may possibly cause the termination of the application -
WARNING: Can continue, but with caution -
INFO: Information showing the noteworthy actions by the App -
FINE: Details that is not usually noteworthy but may be useful in debugging e.g. print the actual list instead of just its size
3.7. Configuration
Certain properties of the application can be controlled (e.g App name, logging level) through the configuration file (default: config.json).
4. Documentation
We use asciidoc for writing documentation.
| We chose asciidoc over Markdown because asciidoc, although a bit more complex than Markdown, provides more flexibility in formatting. |
4.1. Editing Documentation
See UsingGradle.adoc to learn how to render .adoc files locally to preview the end result of your edits.
Alternatively, you can download the AsciiDoc plugin for IntelliJ, which allows you to preview the changes you have made to your .adoc files in real-time.
4.2. Publishing Documentation
See UsingTravis.adoc to learn how to deploy GitHub Pages using Travis.
4.3. Converting Documentation to PDF format
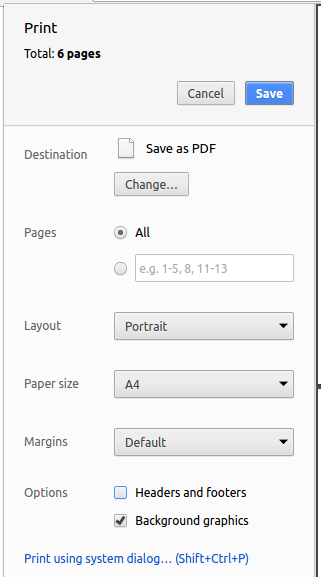
We use Google Chrome for converting documentation to PDF format, as Chrome’s PDF engine preserves hyperlinks used in webpages.
Here are the steps to convert the project documentation files to PDF format.
-
Follow the instructions in UsingGradle.adoc to convert the AsciiDoc files in the
docs/directory to HTML format. -
Go to your generated HTML files in the
build/docsfolder, right click on them and selectOpen with→Google Chrome. -
Within Chrome, click on the
Printoption in Chrome’s menu. -
Set the destination to
Save as PDF, then clickSaveto save a copy of the file in PDF format. For best results, use the settings indicated in the screenshot below.
4.4. Site-wide Documentation Settings
The build.gradle file specifies some project-specific asciidoc attributes which affects how all documentation files within this project are rendered.
Attributes left unset in the build.gradle file will use their default value, if any.
|
| Attribute name | Description | Default value |
|---|---|---|
|
The name of the website. If set, the name will be displayed near the top of the page. |
not set |
|
URL to the site’s repository on GitHub. Setting this will add a "View on GitHub" link in the navigation bar. |
not set |
|
Define this attribute if the project is an official SE-EDU project. This will render the SE-EDU navigation bar at the top of the page, and add some SE-EDU-specific navigation items. |
not set |
4.5. Per-file Documentation Settings
Each .adoc file may also specify some file-specific asciidoc attributes which affects how the file is rendered.
Asciidoctor’s built-in attributes may be specified and used as well.
Attributes left unset in .adoc files will use their default value, if any.
|
| Attribute name | Description | Default value |
|---|---|---|
|
Site section that the document belongs to.
This will cause the associated item in the navigation bar to be highlighted.
One of: * Official SE-EDU projects only |
not set |
|
Set this attribute to remove the site navigation bar. |
not set |
4.6. Site Template
The files in docs/stylesheets are the CSS stylesheets of the site.
You can modify them to change some properties of the site’s design.
The files in docs/templates controls the rendering of .adoc files into HTML5.
These template files are written in a mixture of Ruby and Slim.
|
Modifying the template files in |
5. Testing
5.1. Running Tests
There are three ways to run tests.
| The most reliable way to run tests is the 3rd one. The first two methods might fail some GUI tests due to platform/resolution-specific idiosyncrasies. |
Method 1: Using IntelliJ JUnit test runner
-
To run all tests, right-click on the
src/test/javafolder and chooseRun 'All Tests' -
To run a subset of tests, you can right-click on a test package, test class, or a test and choose
Run 'ABC'
Method 2: Using Gradle
-
Open a console and run the command
gradlew clean allTests(Mac/Linux:./gradlew clean allTests)
| See UsingGradle.adoc for more info on how to run tests using Gradle. |
Method 3: Using Gradle (headless)
Thanks to the TestFX library we use, our GUI tests can be run in the headless mode. In the headless mode, GUI tests do not show up on the screen. That means the developer can do other things on the Computer while the tests are running.
To run tests in headless mode, open a console and run the command gradlew clean headless allTests (Mac/Linux: ./gradlew clean headless allTests)
5.2. Types of tests
We have two types of tests:
-
GUI Tests - These are tests involving the GUI. They include,
-
System Tests that test the entire App by simulating user actions on the GUI. These are in the
systemtestspackage. -
Unit tests that test the individual components. These are in
seedu.souschef.uipackage.
-
-
Non-GUI Tests - These are tests not involving the GUI. They include,
-
Unit tests targeting the lowest level methods/classes.
e.g.seedu.souschef.commons.StringUtilTest -
Integration tests that are checking the integration of multiple code units (those code units are assumed to be working).
e.g.seedu.souschef.storage.StorageManagerTest -
Hybrids of unit and integration tests. These test are checking multiple code units as well as how the are connected together.
e.g.seedu.souschef.logic.LogicManagerTest
-
5.3. Troubleshooting Testing
Problem: HelpWindowTest fails with a NullPointerException.
-
Reason: One of its dependencies,
HelpWindow.htmlinsrc/main/resources/docsis missing. -
Solution: Execute Gradle task
processResources.
6. Dev Ops
6.1. Build Automation
See UsingGradle.adoc to learn how to use Gradle for build automation.
6.2. Continuous Integration
We use Travis CI and AppVeyor to perform Continuous Integration on our projects. See UsingTravis.adoc and UsingAppVeyor.adoc for more details.
6.3. Coverage Reporting
We use Coveralls to track the code coverage of our projects. See UsingCoveralls.adoc for more details.
6.4. Documentation Previews
When a pull request has changes to asciidoc files, you can use Netlify to see a preview of how the HTML version of those asciidoc files will look like when the pull request is merged. See UsingNetlify.adoc for more details.
6.5. Making a Release
Here are the steps to create a new release.
-
Update the version number in
MainApp.java. -
Generate a JAR file using Gradle.
-
Tag the repo with the version number. e.g.
v0.1 -
Create a new release using GitHub and upload the JAR file you created.
6.6. Managing Dependencies
A project often depends on third-party libraries. For example, Sous Chef depends on the http://wiki.fasterxml
.com/JacksonHome[Jackson library] for XML parsing. Managing these dependencies can be automated using Gradle. For example, Gradle can download the dependencies automatically, which is better than these alternatives.
Appendix A: Product Scope
Target user profile:
-
prefer home-cooked meals and has a need to manage meal preparation schedule
-
interested to explore different recipes and receive suggestions on the next meal
-
requires a kitchen-helper providing step-by-step instructions
-
like to keep track of nutrition and calories intake
-
has needs for a shopping list based on the meals planned
Value proposition: Plan and guide health-conscious occupied working adults in preparing home-cooked meals
Appendix B: User Stories
Priorities: High (must have) - * * *, Medium (nice to have) - * *, Low (unlikely to have) - *
B.1. Ingredient Management
| Priority | As a … | I want to … | So that I can… |
|---|---|---|---|
|
user |
limit the search result of recipes to what I have in my inventory |
cook a meal without buying additional ingredients |
|
user |
Be informed of the name/amount of ingredients that I am lacking |
so that I can buy the shortfall |
|
user with ingredient near expiry |
I can refer to the purchase date on ingredient manager and search for recipes that include those ingredients |
use up my ingredients near expiry |
|
user |
see recipes that can use the most number of ingredients in the ingredient manager |
cook with the maximum utilization of my ingredients |
|
user who wants to cook more than one serving of dishes |
get the accordingly calculated missing amount of ingredients |
- |
B.2. Meal Planner
| Priority | As a … | I want to … | So that I can… |
|---|---|---|---|
|
user |
plan my meals for breakfast, lunch and dinner |
I can remember my meals for each day |
|
fickle-minded user |
edit my meal plans |
I can add different recipes if I change my mind |
|
efficient user |
clear the meal planner immediately at the end of the week |
I can save time |
|
health-conscious user |
view the nutritional value of each recipe |
I can choose recipes according to my nutritional needs |
|
meticulous user |
view the time taken for each recipe |
I can plan ahead for meal preparations to fit my schedule |
B.3. User Profiling
| Priority | As a … | I want to … | So that I can… |
|---|---|---|---|
|
undecided user |
get random recipe suggestions |
get new ideas on what to cook |
|
user |
get suggestions to cook based on my viewing and cooking history |
learn to cook similar dishes that I may like |
|
user |
favourite a recipe that I really like |
save them into my favourites for easy reference |
|
user |
remove a recipe from my favourites |
remove a recipe that I no longer like |
|
user |
list out all my favourite recipes |
view all of my favourite recipes at a glance |
B.4. Recipes Management and cook-mode
| Priority | As a … | I want to … | So that I can… |
|---|---|---|---|
|
indian |
search for recipes of Indian dishes |
prepare a wholesome meal for my family |
|
vegetarian |
search for vegan option |
prepare self-make food for my dietary requirements |
|
mum |
search for kids-friendly recipes |
prepare food that is to my kids liking |
|
amateur cook |
follow through the step-by-step cooking instructions explicitly |
my cooking process is guided |
|
user |
provide suggestions to a recipe |
improve on the recipe to value-add the community |
|
picky user |
search for recipes with good reviews |
prepare tasty food that is worth the calories |
|
user |
“like/dislike” reviews on a recipe made by other users |
credit/discredit valid/invalid reviews |
B.5. Health Plan
| Priority | As a… | I want to … | So that I can… |
|---|---|---|---|
|
new user |
be able to easily use the interface without hassle |
easily learn the interface without difficulty |
|
health-conscious user |
be able to view the nutritional breakdown |
Know what food to cut down or replace |
|
fickle user |
be able to change plans or make new plans on the go |
make changes when errors are made |
|
user trying to be more healthy |
be recommended healthy recipes by the system |
save the effort needed to search online |
|
experimental user |
be able to have many plans |
try out different plans on the go |
Appendix C: Use Cases
(For all use cases below, the System is the Sous Chef and the Actor is the user, unless specified otherwise)
C.1. Ingredient Management
Use case: UC11 – List Ingredient
MSS
-
User requests to list ingredients.
-
System shows list of ingredients.
Use case ends.
Use case: UC12 – Add Ingredient
MSS
-
User requests to add an ingredient.
-
System adds the ingredient at the rear of the list and shows the list.
Use case ends.
Extensions
-
1a. System prompt insufficient/invalid contents.
-
1a1. System show the message.
Use case ends.
-
Use case: UC13 – Edit Ingredient
MSS
-
User requests to edit an ingredient.
-
System reflects the change to the list and show the list.
Use case ends.
Extensions
-
1a. System prompt insufficient/invalid contents.
-
1a1. System show the message.
Use case ends.
-
Use case: UC14 – Delete Ingredient
MSS
-
User requests to delete an ingredient.
-
System deletes the ingredient and shows the list.
Use case ends.
Extensions
-
1a. The ingredient does not exist in the ingredient manager.
-
1a1. System show the message.
Use case ends.
-
Use case: UC15 – Find Ingredient
MSS
-
User requests to find ingredients.
-
System show the list of ingredients that contains the keywords.
Use case ends.
Use case: UC16 – Search recipes according to ingredients
MSS
-
User selects both mandatory and desirable ingredients for the search.
-
System shows the filtered and sorted list of recipes.
-
User selects a recipe.
-
System shows recipe specifying missing ingredients and its amount, calculated according to the number of servings.
Use case ends.
C.2. Meal Planner
Use case: UC21 – Add recipe to meal planner
MSS
-
User requests to list available recipes.
-
System shows list of available recipes.
-
User selects desired recipe and adds it to the desired meal index.
-
System shows the recipe listed under the indicated meal index.
Use case ends.
Use case: UC22 – Delete recipe from meal planner
MSS
-
User requests to view current meal plan.
-
System shows current meal plan.
-
User requests to delete unwanted recipe.
-
System shows specified meal index as empty.
Use case ends.
Use case: UC23 – View meal plan
MSS
-
User requests to view current meal plan.
-
System shows current full meal plan.
Use case ends.
Use case: UC24 – View meal recipe
MSS
-
User requests to view recipe for a specific meal index.
-
System shows the full recipe of the specified meal index.
Use case ends.
C.3. User Profiling
Use case: UC31 - Request surprise recipe
MSS
-
User requests to wants to cook something new, but has no idea what they want to try.
-
User request for surprise recipe
-
System displays random recipe
Use case ends.
Use case: UC32 – Favourite recipe
MSS
-
User lists a selection of recipes (Based on his search parameters).
-
User selects a recipe to view.
-
User likes that recipe, and adds it to their "Favourite Recipe" list.
Use case ends.
Use case: UC33 – Suggest recipe
MSS
-
User wants to try a new recipe.
-
A list of 3 new recipes (That the user hasn’t cooked before, and based on their preferences, viewing and cooking history) will be displayed to the user.
Use case ends.
C.4. Recipes Management and cook-mode
Use case: UC41 – Search for Recipe
MSS
-
User chooses to search for recipe.
-
System requests for details.
-
User enters keywords.
-
System displays recipes.
Use case ends.
Use case: UC42 – View Recipe
MSS
-
User searches for recipe (UC41).
-
User chooses a recipe.
-
System displays recipe details.
Use case ends.
Use case: UC44 – Navigate Recipe [Coming up in V2.0]
MSS
-
User views recipe (UC42).
-
User chooses to enter navigation mode.
-
System displays instruction.
-
User chooses next instruction.
Steps 3 – 4 are repeated until end of recipe’s instruction or user chooses to end navigation.
Use case ends.
Extensions
-
3a. System displays timer for duration specific instruction.
-
3b. User chooses to start timer.
-
3c. System displays countdown.
-
3d. System displays alert when timer ends.
Use case resumes at step 3.
-
*c. At any time, user chooses to end timer.
-
c1. System ends timer.
Use case resumes at step 3.
-
Use case: UC45 – Add Recipe
MSS
-
User chooses to add recipe.
-
System requests for details.
-
User enters details.
-
User chooses to save.
-
System displays saved recipe.
Use case ends.
Extensions
-
4a. System detects missing field(s).
-
4a1. System requests for input of missing field(s).
-
4a2. User enters details.
-
Steps 4a1 – 4a2 are repeated until the data entered are correct.
-
Use case resumes at step 5.
C.5. Health planner
Use case: UC51 – Create plan
MSS
-
User requests to create a plan.
-
User enters details for the plan.
-
System creates the plan.
Use case ends.
Extensions
-
2a. User enters invalid details.
-
2a1. System shows error message.
Use case resumes at 2.
-
Use case: UC52 – Edit plan
MSS
-
User requests to edit a plan.
-
System retrieves the list of plans by user.
-
User select the plan to edit.
-
User enters the new details to the plan.
-
System updates the details.
Use case ends.
Extensions
-
2a. No prior plan.
Use case ends.
-
4a. Invalid details.
-
4a1. System shows an error message.
Use case returns to 4.
-
Use case: UC53 – Delete plan
MSS
-
User requests to delete plan.
-
System shows list of plans.
-
User selects plan to delete.
-
System deletes the selected plan.
Use case ends.
Extensions
-
2a. No pre-existing plan.
Use case ends.
Use case: UC54 – Enter dietary intakes for the day
MSS
-
User request to enter intake.
-
System shows list of plans.
-
User selects plan from list.
-
System shows list of recipes to select.
-
User selects recipe to add into list.
-
System adds the recipe to list.
Use case ends.
Extensions
-
2a. No existent plan.
Use case ends.
-
4a. No recipe to show.
Use case ends.
Use case: UC55 – Remove an recipe from the dietary intakes for the day
MSS
-
User request to remove recipe from intake list.
-
System shows list of recipes.
-
User selects recipe from the list.
-
System removes the selected recipe from the list.
Use case ends.
Extensions
-
2a. No prior ingredient.
Use case ends.
Use case: UC56 – View nutritional Intake
MSS
-
User requests to view nutritional intake entered.
-
System retrieves the list of intakes to show the user.
-
System retrieves the nutritional facts based on the recipes in the list to show the user.
Extensions
-
2a. No data entered previously.
Use case ends.
Use case: UC57 – Compare actual intake against target
MSS
-
User requests to compare the entered data against set target.
-
System shows Target set by User.
-
System calculates and shows the actual intake by user.
-
System calculates the difference in the 2 scores and shows the user the percentage difference(positive or negative) from set target.
Use case ends.
Appendix D: Non Functional Requirements
-
Should work on any mainstream OS as long as it has Java
9or higher installed. -
Should be able to hold up to 1000 recipes without a noticeable sluggishness in performance for typical usage.
-
A user with above average typing speed for regular English text (i.e. not code, not system admin commands) should be able to accomplish most of the tasks faster using commands than using the mouse.
Appendix F: Instructions for Manual Testing
Given below are instructions to test the app manually.
| These instructions only provide a starting point for testers to work on; testers are expected to do more exploratory testing. |
F.1. Launch and Shutdown
-
Initial launch
-
Download the jar file and copy into an empty folder
-
Double-click the jar file
Expected: Shows the GUI with a set of sample recipes. The window size may not be optimum.
-
-
Saving window preferences
-
Resize the window to an optimum size. Move the window to a different location. Close the window.
-
Re-launch the app by double-clicking the jar file.
Expected: The most recent window size and location is retained.
-
F.2. Adding of recipe
-
Adding of a non-duplicate recipe
-
Prerequisites: Switched to
-recipecontext and recipe to be added is not in SousChef. -
Test case:
add n/Chicken Rice d/3 c/20Mcont i/Remove skin from #chicken 500 gram.cont i/Boil chicken in #water 700 ml for 20m c/20Mend
Expected: Recipe added to the end of recipes list. Details of the added recipe shown in the status message. Timestamp in the status bar is updated. -
Test case:
add n/Tuna Roll d/3 c/10Mend
Expected: No recipe is added. Error details shown in the status message. Status bar remains the same.
-
-
Adding of a duplicate recipe
-
Prerequisites: Switched to
-recipecontext. -
Test case:
add n/Egg Roll d/2 c/10Mcont i/Spread #rice 100 gram on the mat.cont i/Put #egg 1 piece on top of the rice.cont i/Roll the rice.endadd n/Egg Roll d/2 c/10M
Expected: No recipe is added. Error details shown in the status message. Status bar remains the same.
-
F.3. Editing a recipe
-
Editing a recipe while all recipes are listed
-
Prerequisites: Switched to
-recipecontext and list all recipes using thelistcommand. Multiple recipes in the list.-
Test case:
edit 1 n/Chicken Burger
Expected: First recipe is updated with a new name. Details of the edited recipe shown in the status message. Timestamp in the status bar is updated. -
Test case:
edit 1
Expected: No recipe is edited. Error details shown in the status message. Status bar remains the same.
-
-
F.4. Deleting a recipe
-
Deleting a recipe while all recipes are listed
-
Prerequisites: Switched to
-recipecontext and list all recipes using thelistcommand. Multiple recipes in the list. -
Test case:
delete 1
Expected: First recipe is deleted from the list. Details of the deleted recipe shown in the status message. Timestamp in the status bar is updated. -
Test case:
delete 0
Expected: No recipe is deleted. Error details shown in the status message. Status bar remains the same. -
Other incorrect delete commands to try:
delete,delete x(where x is larger than the list size)
Expected: Similar to previous.
-
F.5. Finding a recipe
-
Finding a recipe while all recipes are listed
-
Prerequisites: Switched to
-recipecontext and list all recipes using thelistcommand. Multiple recipes in the lsit. -
Test case:
find vegetarian noodles 1 20M
Expected: Recipes meeting all the keywords is listed. Number of listed recipes shown in the status message. Status bar remains the same. -
Test case:
find
Expected: No recipe listed. Error details shown in the status message. Status bar remains the same.
-